Baby Shower Gift Ideas
baby-shower.com
Baby Shower
Baby Shower Themes
   

Baby Shower Games


Baby Shower Resources


Baby Invitations
Baby Shower Invitations

Customize your invitations online and have them delivered.


Additional Invitation Info


Advice from the 8-Step Guide
Creating a Guest List

Q&A
Guest List Etiquette

How to make your own
Hand Stamped Invitation


Classic Themes
Baby Boy - Blue
Baby Girl - Pink
Nursery Shower
Nursery Rhymes
Ducky Shower
Diapers & Essentials
Time of Day
April Shower
Twinkle Little Star
Winnie the Pooh
Noah's Ark
Baby's First
Clothesline

Special Situations
Baby Sprinkle 2nd, 3rd baby
Peas in a Pod Twins
Double your Fun Twins
Distance Shower
Adoption Shower
Pampering Mom
Baby as Special Guest
Big Sibling
Couples Men are invited
Co-worker Shower
Ladies Luncheon

More Great Theme Ideas
Candy Land
Sports Baby

Little Lamb
Green Eco-shower
ABC Learn with Me

Library for Baby
Little Angel
Bear Necessities
Gift Basket
Scrapbooking
Born to Rock
Western Shindig NEW!
Keeping Baby Safe
Baby Naming Party
Words of Wisdom
Frogs NEW!
Little Red Wagon NEW!

POETRY by Theme
Baby Shower Poetry


Baby Shower Ideas


Invitation Ideas
from our Visitors


What's yours? Email us!


Shower Invitations


Hand Stamped Invitations

By Sirena Van Schaik

When it comes to invitations there really is no limit to the designs you can find, the quality of paper or the images that you can flood them with.  There are hundreds of card companies out there with thousands of invitations to choose from.  You can go with time honoured designs or branch out into a new area and use a card that is designed for anything, from blank note cards to children’s birthdays. 

But one type of invitation that has become a popular choice for many crafty hostesses out there is the hand stamped invitation.

When I was 16, a close friend of mine raved about rubber stamping and how she wanted to create a business completely around them.  I have to admit that I looked at her with a peculiar tint to my eye and wondered how on earth you could start a business with rubber stamps.  On top of that, I stared at her embossed images and could see absolutely no use for them so when it came to crafts, we both went our separate ways.  

Fast forward 12 years and you would have found me happily stamping the birth announcements for my second son.  I realized something much later than my friend had, stamping can be an enjoyable endeavour and there is a strong sense of pride when you create a card that has everyone gasping over how exquisite it is.

Stamping has come a long way from the closely guarded secret to being a very popular and mainstream craft that is enjoyed by everyone of all ages.  It is easy to do and you don’t need a degree in art to create some beautiful masterpieces, all you need are the proper supplies and a little bit of know how.  In this article, I hope to give you that know-how but it will be up to you to get the supplies.
What you will need:

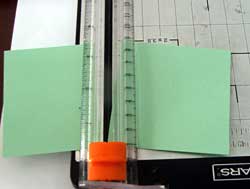
  •  Several sheets of different colored card stock, 8.5” x 11”.
  • A straight edged cutter
  • Stamp ink
  • Stamps
  • Embellishments (these can be a anything from ribbons to brads to stickers, check out the scrapbooking aisle in your local craft store)
  • Glue stick or double sided tape
  • Envelopes


A few tips before we begin:

When it comes to choosing your supplies there are a few tips that I felt I should share.  First, you will want to purchase glue that is acid free, glue stick is great for some things while double sided tape is excellent for making assembly of the layered paper much faster.  I use both and it really depends upon the weight of the paper or if I am using heavy embellishments.

In regards to the quality of the glue stick, don’t feel like you have to purchase the expensive craft glue stick that you find in craft stores.  The best glue stick I have ever used is the no name brand that comes 2 in a pack for $1.29.  I had my doubts originally but the other glue sticks were just not holding properly so I gave the no name brand a chance.  I prefer it for making cards although I will go back to the crafters glue stick when mounting photos.

Paper is another area where you do not have to spend a lot of money on.  If you do not have a straight cutter, you can buy pre-cut and pre-folded cards.  When you purchase the paper, use the lighter cardstock that comes in packages of 50. I like to use the lighter paper for the folded card and then I will purchase the nicer, heavier paper for the layers (but not always). This will save you a lot of money if you do it this way.

Lastly, if you are using brads on your cards, take a run to the local business supplies store.  They sell many different types of brads for offices and are a few cents (or dollars in some cases) than the brads that are sold specifically for scrapbooking and stamping.  You can also find the decorative paper clips at some stationary stores and a few other items that can be used for embellishing.


What I used for my example:

Here is what I used for the card featured at the top of this article if you are interested in recreating it.

  • 1     8.5”x11” sheet of white cardstock
  • 1     8.5”x11” sheet of pastel pink cardstock
  • 1      8.5”x11” sheet of mint green cardstock
  • 1     8.5”x11” sheet of gold cardstock (the only heavy cardstock I used)
  • 3      Silver diamond brads
  • 1      Green and Pink Gingham ribbon
  • Pencil Crayons
  • Stamps  (I used a wonderful set from Stampin’ Up called “A New Little Someone” and a loose stamp that I picked up from a dollar store)
  • Ink (I used a Stampin’ Up Classic Stampin’ Pad called Perfect Plum and StazOn Jet Black Ink)


Putting it all together:

  •  Take your white cardstock and cut it in the middle width wise.  You should be left with 2 sheets of paper that are 5.5” long and 8.5” wide.  Fold the card in half so that you have a folded card measuring 4.25”x5.5”.


  • Cut the green, gold and pink cardstock in the diameters below:

Gold Cardstock:   
a. one rectangle that is 3.12”x5.25”

Green Cardstock: 
a. one rectangle that is 3.25”x5.25”
b. One square that is 3.12”x3.12”

Pink Cardstock:    
a. one rectangle that is 3.37”x5.25”
b. One square that is 3.37 ”x3.37”         

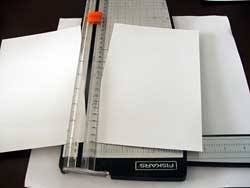
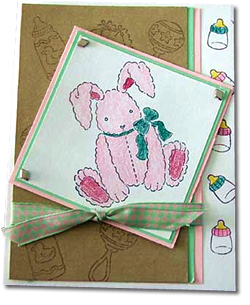
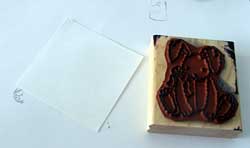
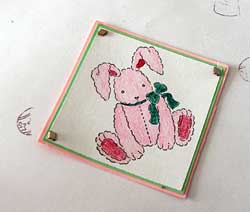
  • Cut a white square 3”x3”.  Place all the cut paper to the side.
  • Put down a wide sheet of paper to protect your work surface and begin stamping.
  • Stamp the bottle, booties and rattles from the set unto the gold cardstock using the “Perfect Plum” stamp ink.  I used the gold to provide a contrast but don’t feel like you need to have a contrasting color.  Using all the same tones can provide stunning effects.  Place to the side.

  
6.  Stamp the bunny onto the 3”x3” square using the StazOn Jet Black Ink. 

Hint:  If you mess up the stamped image with it either being placed in the wrong spot or the image not inking completely, just turn it over and stamp the other side.  The ink should not show through. 

  • Stamp the bottles down the edge of the white card; make sure it is on the side that opens. 
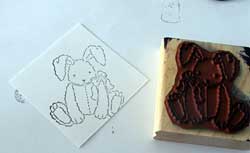
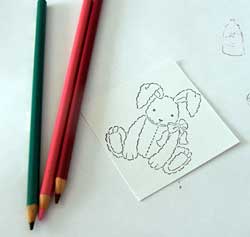
  • Color the bunny and the bottles with pencil crayons or markers.  I used pencil crayons that I pilfered from my children’s art supplies. 
  • Assemble the cardstock and glue together.  I layered from the smallest down to the largest for ease but for the larger layered paper it should go, Gold cardstock on top, mint green next with an overage only on the one side, pink after with the overage only on the one side.  
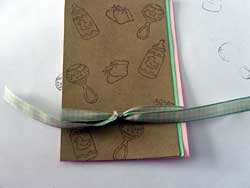
  • Tie ribbon onto the gold, pink and green cardstock before gluing to the white card.  I did it with just a not since a bow can be overpowering on some cards.  Cut off excess ribbon. 
  • Glue to card.
  • Assemble the squares with the stamped image being placed on top of the green and then on top of the pink.  There should be overage all around the white to create a bordered effect.
  • Place square layers onto a cutting board or other protected surface, push a pin through to create a hole (you can also purchase a very small hole punch for this).
  • Add brads. 
  • Glue to the card, I glued it skewed and off center with the corner missing the brad tucked under the ribbon but you can assemble it anyway that you like or add a fourth brad.
  • Stamp, glue or print the invitation information inside the card.  If you are printing, visit our printing template and print your invitations before you cut and assemble your cards. 

If you want, you can also stamp an image to the envelope or just leave them blank.  One thing is for sure, you will have a feeling of accomplishment and everyone will think that you are simply amazing.


If you like the idea of making your own invitations but simply don't have the time, try these pre-made, customizable invitations, delivered to your door.


copyright
Copyright © 1997-2009 baby-shower.com
All rights reserved. May not be reproduced.

Share this page!


Baby Shower Resources:

Baby Bingo Games and Favors - Gorgeous baby shower games (some to download),
plus personalized favors, unique customized gifts, and fast delivery!
Baby Shower Planning Kits - All your baby shower planning needs are covered here! Ready-to-play games, favors with personalization, gorgeous diaper cakes, DIY baby shower kits, decorations.
Shower Invitations and Personalized Napkins for your baby shower.

Other Great Sites for Women:
Free Online Romance Novel - Read an online romance novel from published author.
BadaBadaBride Wedding Showers - Your top source for bridal shower favors, games, decorations.


Baby Shower Games


Business Inquiries

Copyright © 1997-2010 Baby-Shower.com. All rights reserved. This material may NOT be republished or
rewritten in any form either online or offline. Monitored by Copyscape.com and other media ownership services.
Privacy and Terms of Use